Today started the exciting sale from SU! Click the link to the right under "specials" or go here!
So exciting!! Order now, or you might miss out!
Wednesday, November 26, 2008
Sunday, November 16, 2008
And now I present to you...
some cards!! Finally, right? I have been busy working, and not so busy stamping lately. The DB (Dear Boyfriend) doesn't like me on the computer all the live long day, so I try to limit the time I spend on the computer. I need to clean up my stamp room, because I am scared to go in there right now! I hate messes, but I also hate cleaning. Besides the fact that since my stamping area is new, I have very little storage at the moment, so that means that even if I did clean the area up, it would not be very organized. It's a work in progress, I hope that I have at least an area at our next place fit for stamping! Now, on to the cards!
I made these cards for my Aunt and her work buds. I think they turned out pretty good, and the ladies really like them! (We started with the first card, and finished with the second.) And we were cramped for time, we only had an hour to work...but everyone finished their two cards. I am going to try to present my cards a little differently. (when I have time to do this, I will actually spell out the dimensions, etc of the card. It will be more descriptive this way.
 I got the idea for this card from Nancy, be sure and check out her card too!
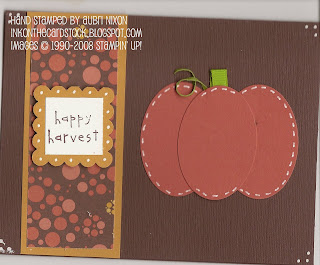
I started with a 4 1/4" x 5 1/2" piece of chocolate chip textured cs. Then I layered a 4 1/4" x 1 3/4" piece of more mustard cs with a 4" x 1 1/2" piece of Autumn Vine DSP. I then punched a piece of more mustard cs with the scalloped square punch. This card uses only one stamp. It is a stamp from the Loads of Love Accessories stamp set. (I just got some watercolor wonder crayons, so prepare for some Loads of Love cards here soon!) On a 1" x 1" piece of whisper white cs I stamped "happy harvest" in chocolate chip ink. For the pumpkin, I punched three ovals with the wide oval punch in really rust cs. I folded a small piece (perhaps 3/4") of old olive 1/4" grosgrain ribbon and used snail adhesive to attach the ribbon to the middle oval. I wrapped a very thin scrap of old olive cs around a toothpick to make the vine, and attached it to the middle oval with tombow adhesive. I added faux stitching and faux piercing with a white gel pen.
You might notice that the bottom left hand corner is smeared, which is a result of me not waiting until the very end to add the gel pen...you live and learn I guess! I just wanted the mistake FOR you ;)...
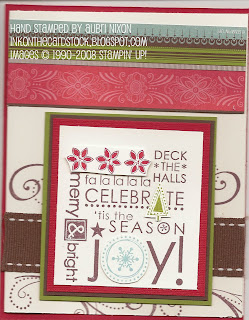 Sometimes when I make a card, I realize my mistake too late, and don't feel like changing it for my sample, instead I change it for the kits that I make after the fact. This card is an example of this. My whisper white cs card measures 4 1/8" x 5 1/8" when it should have measured 4" x 5 1/8". The reason is that I have the card mounted on a 4 1/4" x 5 1/2" piece of real red textured cs, and you can only see the mount on one side of the whisper white card. I wanted the real red to be evenly around the white. Oh well...I will use the measurements for my intended card, not for the actual card shown here. First off, I sponged real red ink on the poinsettias, old olive on the tree, and baja breeze on the snowflake of a season of joy stamp. Then I cut the images out (I left the three flowers connected to make my life easier, but they could just have easily been cut apart). I then stamped the entire image in chocolate chip on a 2 1/2" x 2 3/4" piece of whisper white cs. This was layered on top of a 2 3/4" x 3" piece of real red textured cs, a 2 7/8" x 3 1/8" piece of chocolate chip cs, and a 3" x 3 1/4" piece of old olive cs. I added the previously cut out pieces using dimensionals to add a little pop. I stamped my favorite swirly image from season of joy on the card base (in chocolate chip, of course) where I thought it would show from behind the main image. I added a strip of 1" double stitched grosgrain ribbon to fit the card base and a 1 1/2" x 4" piece of ski slope DSP. Cute huh?
I made these cards for my Aunt and her work buds. I think they turned out pretty good, and the ladies really like them! (We started with the first card, and finished with the second.) And we were cramped for time, we only had an hour to work...but everyone finished their two cards. I am going to try to present my cards a little differently. (when I have time to do this, I will actually spell out the dimensions, etc of the card. It will be more descriptive this way.
 I got the idea for this card from Nancy, be sure and check out her card too!
I started with a 4 1/4" x 5 1/2" piece of chocolate chip textured cs. Then I layered a 4 1/4" x 1 3/4" piece of more mustard cs with a 4" x 1 1/2" piece of Autumn Vine DSP. I then punched a piece of more mustard cs with the scalloped square punch. This card uses only one stamp. It is a stamp from the Loads of Love Accessories stamp set. (I just got some watercolor wonder crayons, so prepare for some Loads of Love cards here soon!) On a 1" x 1" piece of whisper white cs I stamped "happy harvest" in chocolate chip ink. For the pumpkin, I punched three ovals with the wide oval punch in really rust cs. I folded a small piece (perhaps 3/4") of old olive 1/4" grosgrain ribbon and used snail adhesive to attach the ribbon to the middle oval. I wrapped a very thin scrap of old olive cs around a toothpick to make the vine, and attached it to the middle oval with tombow adhesive. I added faux stitching and faux piercing with a white gel pen.
You might notice that the bottom left hand corner is smeared, which is a result of me not waiting until the very end to add the gel pen...you live and learn I guess! I just wanted the mistake FOR you ;)...
 Sometimes when I make a card, I realize my mistake too late, and don't feel like changing it for my sample, instead I change it for the kits that I make after the fact. This card is an example of this. My whisper white cs card measures 4 1/8" x 5 1/8" when it should have measured 4" x 5 1/8". The reason is that I have the card mounted on a 4 1/4" x 5 1/2" piece of real red textured cs, and you can only see the mount on one side of the whisper white card. I wanted the real red to be evenly around the white. Oh well...I will use the measurements for my intended card, not for the actual card shown here. First off, I sponged real red ink on the poinsettias, old olive on the tree, and baja breeze on the snowflake of a season of joy stamp. Then I cut the images out (I left the three flowers connected to make my life easier, but they could just have easily been cut apart). I then stamped the entire image in chocolate chip on a 2 1/2" x 2 3/4" piece of whisper white cs. This was layered on top of a 2 3/4" x 3" piece of real red textured cs, a 2 7/8" x 3 1/8" piece of chocolate chip cs, and a 3" x 3 1/4" piece of old olive cs. I added the previously cut out pieces using dimensionals to add a little pop. I stamped my favorite swirly image from season of joy on the card base (in chocolate chip, of course) where I thought it would show from behind the main image. I added a strip of 1" double stitched grosgrain ribbon to fit the card base and a 1 1/2" x 4" piece of ski slope DSP. Cute huh?
Sunday, November 9, 2008
Exciting News
Stampin' Up! will be having a sale from November 26-December 1st. No one knows the details yet, but we know it will be a good one...It is a sale to celebrate the season...
It is called: Holiday Extravaganza.
More details to come. The anticipation is killing me, and I hope that now you will be waiting as anxiously as I! :D
It is called: Holiday Extravaganza.
More details to come. The anticipation is killing me, and I hope that now you will be waiting as anxiously as I! :D
Thursday, October 30, 2008
It's official! :D
I finally got around to applying for my business license! I realized that I wanted to have a business account for my Demonstratorship, so that I can keep track of my monies from SU! I hope I filled it out right...it was so darn confusing!!
$15 isn't bad...
_____________
In other news, if you haven't heard about it, or seen it yet, starting November 1st you can buy the Country Living stamping kit! It is absolutely FABULOUS! The greatest part about it is that the possibilities are endless with it! You can make cards, ornaments, home decorations, etc. It comes with a stamp set, 3 stampin spots, craft ink reinker, adhesive, ribbon, accessories, chipboard, cardstock...GLITTER!! All you need are scissors, and you could get away with out having them! :D
I'll show you projects later....but seriously you'll want to buy it.
AND if you want to buy it, you should host a party with me, because if you want it, you know your friends will too...and just think of all the money and free stamps you'll get right there!! :D
Saturday, October 25, 2008
Not just for Christmas, my friends!
 You might think that the Season Of Joy stamp set, (shown above) is only for Christmas, which, I actually thought before this weekend. I was stamping like crazy in preparation for my first workshop ever! My mom hosted this workshop at her house, and I'm not going to lie, I had butterflies during the drive over! :D
It went pretty well, the ladies loved the Country Living Promotion that starts in November, so much so that we might actually place this workshop on November 1st so the ladies can buy the Kit! :D So anyway, I was struggling to find a card to have the ladies make. I was limited by the fact that my mom wanted a Christmas card, which really isn't much of a limitation, as I have like 3 or more Christmas stamp sets....the real limitation was that I wanted to use some of the bulk buy paper I have, and was trying to force something to work. The first card I made is this one:
 I didn't really like it. I thought others wouldn't like it, and so I moved on. (The more I look at it though, I really do like it.) Who would have thought that Tangerine Tango and Kiwi Kiss would be on a Christmas card??
Stamps: Season of Joy
Paper: Whisper White CS, Tangerine Tango CS, Kiwi Kiss Textured CS, Frosty Day DSP
Ink: Tangerine Tango, Kiwi Kiss, Close to Cocoa
Paper: Whisper White CS, Tangerine Tango CS, Kiwi Kiss Textured CS, Frosty Day DSP
Ink: Tangerine Tango, Kiwi Kiss, Close to Cocoa
Accessories: Whisper White Grosgrain 1/4" ribbon, scallop edge punch
Techniques: Masking
The Masking Technique was actually used for all of these cards. All you do is stamp the flower, or main image on the cardstock, and also stamp it on a scrap piece of computer paper. Cut out the computer paper image so that you have a little weensy bit of white showing, this is your "mask" (in other words you can see all of the image, plus a small border of paper.) Cover the main image with the mask, and stamp around the image as desired. The mask protects the main image and makes it pop out a bit. Cool huh? And pretty easy too! :D

This was the second card I made, and I settled on it as my workshop card. I felt that it would be accepted easier as a more "traditional" Christmas card, with the typical Green, white and red colors. You might notice a little mark of red ink where is shouldn't be, that is only because it fell onto a sponge dauber with Riding hood Red ink on it...it didn't completely ruin the card so no one was injured! ;)
Stamps: Season of Joy
Paper: Whisper White CS, Riding Hood Red CS, Chocolate Chip Textured CS, Garden Green CS
Ink: Tangerine Tango, Kiwi Kiss, Close to Cocoa
Accessories: Whisper White Grosgrain 1/4" ribbon, scallop edge punch, Wide oval punch, sponge daubers, white half-pearls from pretties kit
Techniques: Masking
Accessories: Whisper White Grosgrain 1/4" ribbon, scallop edge punch, Wide oval punch, sponge daubers, white half-pearls from pretties kit
Techniques: Masking
 So once I was done with the card for the workshop, I had to start working on a card for a swap tomorrow. It is a swap with my Upline and her downline (so my "sisters") Only 6 of us will be swapping so it wasn't too difficult for my first ever swap! I hope they like the card. The theme was friendship or thank you. I looked at my first attempt, and said "that could be a thank you card!" Then I looked through my stamp sets for a "thank you" stamp and finally found one I liked in Enjoy every moment!
Stamps: Season of Joy, Enjoy Every Moment
Paper: Whisper White CS, Tangerine Tango CS, Kiwi Kiss Textured CS, Frosty Day DSP
Ink: Tangerine Tango, Kiwi Kiss, Chocolate Chip
Accessories: Whisper White Grosgrain 1/4" ribbon, scallop edge punch, pretties kit Rhinestone brad, paper piercer, paper piercing pad, dimensionals
Techniques: Masking
It was a pretty productive week, and now I've got to get to work on a project for something else! I might be able to start this week, I just need a few things first!
If you're still with me through this long post, thanks for looking!! :D
Remembering a life lost...
I meant to post this a long time ago...but I kept forgetting to do so.
On October 17th 2006 a friend of mine lost her mother.
It was a difficult time. I remember listening as she spoke over speaker phone to her MANY close friends, explaining why she was gone. (Because people notice when she is missing...) I was on the other side of a wall because I already knew what she was going to say during the phone call, along with a couple others.
She was amazingly strong through that difficult time, and I will always remember that. Her family was so supportive (and still is) it blew me away.
So in memory of her mother, I made a card. (The card is still at my house because I didn't have stamps...I just stole a couple from my mom so I'll be able to send that card and mail off my ballot! I'm terrible...but better late than never.) Her mother loved sunflowers, and this was the closest thing to a sunflower I had at the time...
 Stamps: Upsy Daisy
Ink: Whisper White Craft ink
Paper: Creamy Caramel CS, Whisper White CS, Bella Rose DSP, Riding Hood Red CS
Accessories: Linen thread, Paper Piercer, paper-piercing pad, paper-piercing template, scallop edge punch
On October 17th 2006 a friend of mine lost her mother.
It was a difficult time. I remember listening as she spoke over speaker phone to her MANY close friends, explaining why she was gone. (Because people notice when she is missing...) I was on the other side of a wall because I already knew what she was going to say during the phone call, along with a couple others.
She was amazingly strong through that difficult time, and I will always remember that. Her family was so supportive (and still is) it blew me away.
So in memory of her mother, I made a card. (The card is still at my house because I didn't have stamps...I just stole a couple from my mom so I'll be able to send that card and mail off my ballot! I'm terrible...but better late than never.) Her mother loved sunflowers, and this was the closest thing to a sunflower I had at the time...
Stamps: Upsy DaisyInk: Whisper White Craft ink
Paper: Creamy Caramel CS, Whisper White CS, Bella Rose DSP, Riding Hood Red CS
Accessories: Linen thread, Paper Piercer, paper-piercing pad, paper-piercing template, scallop edge punch
Tuesday, October 14, 2008
Another Challenge...
I wanted to try two challenges today SCS Color Combo challenge, and SCS Try a New Technique Challenge. Monday was the Technique challenge: A stair step fold card. It was actually very easy and something I would have never thought to do on my own. The Color Combo was Basic Black and Pink Pirouette, Whisper White was optional. (I threw in some pretty in pink and a touch of Pink Passion). It is amazing...the two challenges I have done so far have made me go outside of my box. I would never have created this without the challenge, and I still can't believe that I did this one...It is really not my style! But I like it, so maybe it is my style now! :D

Stamps: Love owl-ways, A happy Heart

Stamps: Love owl-ways, A happy Heart
Paper: Holiday Happenings DSP, Pink Pirouette, Pretty in Pink, Whisper White CS, Basic Black CS
Ink: Pink Pirouette, Basic Black, Pink Passion
Accessories: Blender Pens, Dazzling Diamonds Glitter, Basic Black Ribbon, Dimensionals. Scallop Square punch, Scallop Edge punch.
Techniques: Stair Step Fold Card
Difficulty (1-Easy 5-Advanced): 2
I have to be honest: I did not use Basic Black CS like I say I did. I do not own Basic Black CS. For some reason, I kept thinking that I would never use it. Now I've wished I had it at least twice! I probably would have used more Basic Black CS on this card if I had some...Anyway, what I did do, was sponged Basic Black ink onto Whisper White CS. It looks almost the same...but not! :D
Oh and that xoxo pink pirouette paper, that you can get if you host a $500+ workshop with me! It also comes with some rub-ons and two other designs of paper, AND a set of four season stamps! It is like the best hostess gift ever! :D Talk to me if you're interested!
My First time Tackling a Challenge!
In the world of card making/scrapbooking there is a website called Split Coast Stampers (SCS) I will be adding it to my links of interest. On this website you can find Galleries of cards that people have posted. There are forums you can ask questions on. It is an amazing place to go. Since I am a Stampin' Up! Demonstrator, I have access to a SU! only section. (But the site is just as good for anyone else).
One aspect of SCS that I am intrigued by is the Challenges. These challenges are posted on specific days either on a certain day of the week, or monthly. And most of them are just for fun. This week I participated in my first ever Challenge. The SU! Monthly Demo Planner Challenge. This challenge has a card sketch (the specific layout) and a color combo. I chose the color combo: Pink Passion, Tempting Turquoise, and Basic Black. And I pretty much stuck to the sketch. It isn't my favoritest card (yes, favoritest is a word...in my dictionary) So I think I'll be mailing this one out. I still enjoyed participating in this challenge. So anticipate more challenges in the future.
 I love this stamp set! Everytime I see an owl I am reminded of my grandma (on my mom's side) She collected owls. It is a pleasant reminder of a wonderful woman!
Stamps: Love owl-ways
Paper: Pink Passion textured CS, Rainbow sherbet DSP, Whisper White CS.
Ink: Basic Black, Pink Passion
Accessories: Basic Black Ribbon, White half-pearls,
Techniques: Ink and Blender pens
Difficulty (1-Easy 5-Advanced): 1
One aspect of SCS that I am intrigued by is the Challenges. These challenges are posted on specific days either on a certain day of the week, or monthly. And most of them are just for fun. This week I participated in my first ever Challenge. The SU! Monthly Demo Planner Challenge. This challenge has a card sketch (the specific layout) and a color combo. I chose the color combo: Pink Passion, Tempting Turquoise, and Basic Black. And I pretty much stuck to the sketch. It isn't my favoritest card (yes, favoritest is a word...in my dictionary) So I think I'll be mailing this one out. I still enjoyed participating in this challenge. So anticipate more challenges in the future.
 I love this stamp set! Everytime I see an owl I am reminded of my grandma (on my mom's side) She collected owls. It is a pleasant reminder of a wonderful woman!
 Stamps: Love owl-ways
Paper: Pink Passion textured CS, Rainbow sherbet DSP, Whisper White CS.
Ink: Basic Black, Pink Passion
Accessories: Basic Black Ribbon, White half-pearls,
Techniques: Ink and Blender pens
Difficulty (1-Easy 5-Advanced): 1
WCMD cards
I have finally scanned in the cards I made for WCMD! I think they are pretty darn cute, myself! The 4 ladies that attended really enjoyed making the cards.
Stamps: Deck the Halls, Season of Joy, Contempo Alphabet
Paper: Old Olive CS, Not Quite Navy CS, Whisper White CS, Ski Slope DSP, Real Red CS
Ink: Not Quite Navy, Baja Breeze, Ruby Red, Old Olive
Accessories: Silver Cord, Scallop Edge Punch
Difficulty (1-Easy 5-Advanced): 1

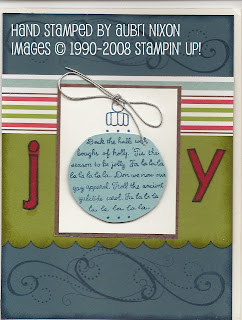
Stamps: Scandinavian Season, Season of Joy
Paper: Whisper White, Baja Breeze CS, Real Red CS, Ski Slope DSP
Ink: Chocolate Chip, Real Red, Baja Breeze
Accessories: Chalks, Dazzling Diamonds Glitter, Real Red Brad, Chocolate Chip Ribbon.
Techniques: Poppin Pastels
Difficulty (1-Easy 5-Advanced): 1
 This one I CASED (copy and share everything) from Understand Blue's Blog. You can find the original here. You might notice that I did change a few things, but I got the idea from her.Stamps: Eat, Drink & Be Scary, Halloween Frights, Season of Friendship
Paper: Ghostly Greetings DSP, Pumpkin Pie CS, Whisper White CS, Chocolate Chip CS, Pumpkin Pie CS.
Ink: Pumpkin Pie, Basic Black, Chocolate Chip, Summer Sun
Accessories: Basic Black Ribbon, Tag and Small Tag punch, Ribbon Hole Punch, 1 3/4" circle punch, White Gel Pen, Basic Black Stampin' Write Marker
Techniques: Rock and Roll
Difficulty (1-Easy 5-Advanced): 2
 I CASED this card from Jenn D, here. And again you'll notice that I actually changed quite a bit. (After I made the card and went back to look at hers, I realized that I had changed more than I thought! But I was thinking about her card when I made it.) Definitely the simplest card I made.

Stamps: Deck the Halls, Season of Joy, Contempo Alphabet
Paper: Old Olive CS, Not Quite Navy CS, Whisper White CS, Ski Slope DSP, Real Red CS
Ink: Not Quite Navy, Baja Breeze, Ruby Red, Old Olive
Accessories: Silver Cord, Scallop Edge Punch
Difficulty (1-Easy 5-Advanced): 1

Stamps: Scandinavian Season, Season of Joy
Paper: Whisper White, Baja Breeze CS, Real Red CS, Ski Slope DSP
Ink: Chocolate Chip, Real Red, Baja Breeze
Accessories: Chalks, Dazzling Diamonds Glitter, Real Red Brad, Chocolate Chip Ribbon.
Techniques: Poppin Pastels
Difficulty (1-Easy 5-Advanced): 1
 This one I CASED (copy and share everything) from Understand Blue's Blog. You can find the original here. You might notice that I did change a few things, but I got the idea from her.
Paper: Ghostly Greetings DSP, Pumpkin Pie CS, Whisper White CS, Chocolate Chip CS, Pumpkin Pie CS.
Ink: Pumpkin Pie, Basic Black, Chocolate Chip, Summer Sun
Accessories: Basic Black Ribbon, Tag and Small Tag punch, Ribbon Hole Punch, 1 3/4" circle punch, White Gel Pen, Basic Black Stampin' Write Marker
Techniques: Rock and Roll
Difficulty (1-Easy 5-Advanced): 2
 I CASED this card from Jenn D, here. And again you'll notice that I actually changed quite a bit. (After I made the card and went back to look at hers, I realized that I had changed more than I thought! But I was thinking about her card when I made it.) Definitely the simplest card I made.
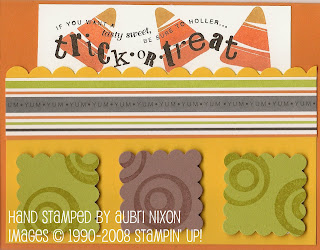
Stamps: Tasty Sweet
Paper: Ghostly Greetings DSP, Pumpkin Pie CS, Whisper White CS, Summer Sun CS, Kiwi Kiss CS, Close to Cocoa CS.
Ink: Basic Black, More Mustard, Pumpkin Pie, Tangerine Tango, Kiwi Kiss, Close to Cocoa
Accessories: Scallop Edge punch, Scallop Square punch
Difficulty (1-Easy 5-Advanced): 1
Paper: Ghostly Greetings DSP, Pumpkin Pie CS, Whisper White CS, Summer Sun CS, Kiwi Kiss CS, Close to Cocoa CS.
Ink: Basic Black, More Mustard, Pumpkin Pie, Tangerine Tango, Kiwi Kiss, Close to Cocoa
Accessories: Scallop Edge punch, Scallop Square punch
Difficulty (1-Easy 5-Advanced): 1
Wednesday, October 8, 2008
Easy to make cards!
Want to make Christmas cards this season? Here is a kit that is very simple and easy. And best of all cute! :D
Make 12 cards and a box for $20! I will score your cards and have them folded for you all you need to do is add the decorations.
Check out this flyer. You will receive the flyer with purchase, and can use the picture as a guide for your cards.
Let me know if you're interested, I'm making an order this friday. (Of course if you decide after friday I'll still be able to get you a kit, it just might take a little longer for me to be able to order it.)
Stay tuned for more kits like this, I'm going to make at least one more to be available for purchase.
Thursday, October 2, 2008
Happy Birthday SU!
Well it is Stampin' Up!'s 20th birthday this month, and what better way to celebrate it than by having discounted stamps for sale?!
In celebration of SU!'s birthday, select birthday stamps are on sale for 20% off, you only have to spend $20 prior to these stamp sets! Everybody has birthdays so you know that the stamps will come in handy!! :D As usual click the image below to see it larger! :D

In celebration of SU!'s birthday, select birthday stamps are on sale for 20% off, you only have to spend $20 prior to these stamp sets! Everybody has birthdays so you know that the stamps will come in handy!! :D As usual click the image below to see it larger! :D
Wednesday, October 1, 2008
World Card Making Day!
So in celebration of World Card Making Day, Stampin' Up! has a very special offer on the simply sent card kits and card elements. They will be 20% off from Oct 4-11th. These kits are perfect for you if you don't have very many supplies, there is a really cute card elements set for christmas cards and you can make 18 cards with that card elements package!
What's the difference between a Card Elements set and a Card Kit? The Elements have paper and accessories, and the stamp sets are sold separately. The card kits come with paper, accessories, ink, adhesive, stamps and envelopes! The only thing missing would be scissors!
Even those of you from far away can order these from me during the week of October 4th-11th at 20% off. Just go to my Stampin' Up! Website and click "Shop Now." Contact me if you have any difficulty doing so.
Those of you that are in town, or will be. I'm holding two open houses.
#1 Sunday, October 5th 1000am-5:oopm
#2 Wednesday, October 8th 4pm-10:00pm
I will have cards ready for you to put together ($2/card), I will have decor elements displayed, and I will have a drawing for everyone that places an order, whoever I pick will get the Hostess benefits for the orders! That's free product, you can't beat that.
If you want to be entered into the drawing you must order from me on the phone or in person. If you order online from me, you will not be entered in the drawing. (the hostess benefits will already be yours on orders >$150. Also, if you order from me (on the phone or in person) the products will be shipped to my house so think about that when you make your decision.
I will also have door prizes that you will need to attend the workshop to receive.
Exciting times!! :D
Wednesday, September 24, 2008
Remember, check out the 15% off stamp sets here! This FABULOUS offer ends with September, so get your order in now! :D I absolutely love Upsy Daisy, Pocket Silhouettes, and Eastern Blooms, and just ordered them at the great low price! (I already had the Contempo Alphabet, which I also love).
Take advantage of this special offer, before it goes away! :D
Take advantage of this special offer, before it goes away! :D
Monday, September 22, 2008
Happy Birthday x2
So today I made two cards in honor of my Aunt JoAnne, and sister (in-law)'s birthdays. They were both born on 9/23. Today was their birthday dinner celebration, they chose The Outback Steakhouse. They were both pretty easy (I only had 1.5 hours to make them both. I started with Michelle's and only had 20 minutes to do Aunt JoAnne's!)
 Aunt JoAnne's Card
Stamps: Party Hearty
Paper: Bella Rose DSP, Chocolate Chip, Pink Pirouette
Ink: Chocolate Chip, Pink Pirouette
Accessories: Pink Pirouette 5/8" Striped Grosgrain Ribbon
Techniques: Rock and Roll
Difficulty (1-Easy 5-Advanced): 1 Michelle's Card
Stamps: A Happy Heart (available in the upcoming MINI Catalog!), Best Wishes and More
Paper: Georgia Peach DSP, Old Olive, Pretty in Pink
Ink: Old Olive, Chocolate Chip
Accessories: Bold Brights Button, Adhesive Die Cut, Gold elastic cord (available in the upcoming MINI Catalog!), Cream halfback pearl (small), scallop edge punch.
Difficulty (1-Easy 5-Advanced): 1
As you can see, one of the stamps, and one of the accessories I used are a sneak peek for the Holiday Mini catalog that will be out the first of October! That means two great things happen on October 1st, #1: The new DECOR ELEMENTS are available for ordering! #2: The Holiday Mini Catalog, is available to order from!!
Either order online from me, or call me and I'll help you order! (Or leave a comment! I'm open to all! :D)
 Aunt JoAnne's Card
Stamps: Party Hearty
Paper: Bella Rose DSP, Chocolate Chip, Pink Pirouette
Ink: Chocolate Chip, Pink Pirouette
Accessories: Pink Pirouette 5/8" Striped Grosgrain Ribbon
Techniques: Rock and Roll
Difficulty (1-Easy 5-Advanced): 1
 Michelle's Card
Stamps: A Happy Heart (available in the upcoming MINI Catalog!), Best Wishes and More
Paper: Georgia Peach DSP, Old Olive, Pretty in Pink
Ink: Old Olive, Chocolate Chip
Accessories: Bold Brights Button, Adhesive Die Cut, Gold elastic cord (available in the upcoming MINI Catalog!), Cream halfback pearl (small), scallop edge punch.
Difficulty (1-Easy 5-Advanced): 1
As you can see, one of the stamps, and one of the accessories I used are a sneak peek for the Holiday Mini catalog that will be out the first of October! That means two great things happen on October 1st, #1: The new DECOR ELEMENTS are available for ordering! #2: The Holiday Mini Catalog, is available to order from!!
Either order online from me, or call me and I'll help you order! (Or leave a comment! I'm open to all! :D)
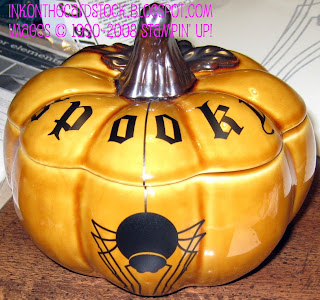
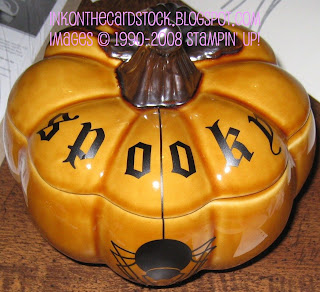
Sooo Exciting! Spooooky! Part 2
So previously I noted that the Spooky Spider Decor Element was available for purchase, and now I have examples of what you can do with it! :D I apologize in advance for some of the quality of the pictures. They are very reflective, and difficult to capture.
I went to Target and found this bowl:

It says that it is a "soup bowl" but I don't know who uses bowls with lids for soup...? I don't, anyway. But I do think it is a perfect candy dish. Now candy dishes, they have lids...anyway: I spotted these bowls with lids, and thought "man that would look way cute with a spider on it!" I measured and it appeared that the Small spider would fit. And lo and behold it did! :D
 Up close, I kind of messed up on the spiders legs, next time I will make slits so that I can put the legs on easier, it is difficult when the surface is so curved.
I also found a jar that looked about the right size for the Medium spider:
I went to Target and found this bowl:
It says that it is a "soup bowl" but I don't know who uses bowls with lids for soup...? I don't, anyway. But I do think it is a perfect candy dish. Now candy dishes, they have lids...anyway: I spotted these bowls with lids, and thought "man that would look way cute with a spider on it!" I measured and it appeared that the Small spider would fit. And lo and behold it did! :D

 Up close, I kind of messed up on the spiders legs, next time I will make slits so that I can put the legs on easier, it is difficult when the surface is so curved.
I also found a jar that looked about the right size for the Medium spider:

 I didn't get a long enough surface, with either the pumpkin nor the clear glass jar, to keep the letters right above the spider. Instead I cut out the spider, put him on, and then cut out each letter, and put them on. I kind of like it this way better anyway. (for an example see previous post, and click on the flyer.)
If you are interested in the pumpkin, I bought 3 today, and will sell them to anyone who asks. However, I will not ship them for fear of breakage, unless paid to do so.
I will also put on the spider Decor Element on for you if desired, but will have to charge for this as well. :D
OH! And I want to add some ribbon to the glass jar, and perhaps a tag, but that will have to wait until the next shipment arrives at my door! :D
As promised...
Here is a picture from the class I had, nearly everyone's card turned out the same, except a few got creative on me! (No complaints, I actually like it because I learn a little something everytime these girls and I get together!)
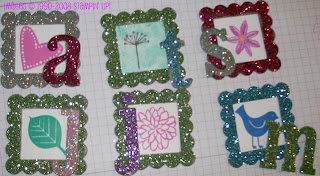 From Left-Right: Top: Mine. Terri's, using Fall Flair (a Hostess set). Marilyn's, also using fall flair, and she colored it in with chalks (she made hers for Sharmell, her daughter).
 Bottom: My Aunt JoAnne, using Best Wishes & More. My Mom, using Fall flair as well. And last, but not least, Michelle, using the Best Wishes & More stamp set also.
The picture does not give them justice, at all! My good camera had no battery, so I had to use my old camera, and I've realized that my camera isn't as good as the new one we have. We decided that these frames would make really cute magnets, and if you did have a picture small enough, they would look great with a picture in them. I was happy with the results, and I think they were too! :D
Friday, September 19, 2008
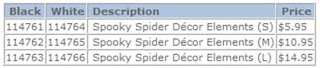
Sooo Exciting! Spooooky!
One of the new Decor Elements is available now for purchase! :D It is a "Spooky Spider," and so cute! Perfect for a bowl or jar, as shown in the flyer. (Click the flyer below to see it enlarged!) Prices are listed below. Order through my website, or contact me if you need help. I'm going out tomorrow to find things to put my Decor elements on, so keep posted for that!

Monday, September 15, 2008
Successful class, and ONLINE ordering!
So yesterday, almost two days ago now that it is late...I had my first class. It went very well, everyone said they enjoyed it, and everyone was happy with their creations. :D I will post a picture later of everyone's frames. I let everyone choose what color glitter they wanted for their letter and for their frame. And I let them pick out their letter. They also picked the stamp they wanted for inside their frame, and some of them got pretty creative! :D I'll add it to this post later, tomorrow hopefully.
__________________
I just want to share this with you all: ONLINE ORDERING is up and running!! This means that you can be anywhere in the world and order products from me! You can even be in IOWA! ;)
All you have to do is go to my website and click shop now. You can look at the products, and see what you want to buy. (Or to view the products, look at the catalog, then search for it in the shopping "search" field.) It's very simple! And of course if you have any problems, just call me and I'll help troubleshoot it for you!
Decor Elements!!
Okay, so if you aren't familiar with Stampin' Up! products, already, you might think that the company only sells rubber stamps, paper, ink and accessories. (I admit, before I joined, I thought that was all that Stampin' Up! produced.) However, this is not the case! Stampin' Up! also makes great home decor products! I'll post a link to the brochure that will be a permanent part of this blog, along with the catalog.
Today, Demonstrators were able to preview (and preorder some of) the upcoming Decor Elements that won't be available until October 1st. Let me tell you that I am very very very excited for them!!! :D There are several Christmas ones, including Santa in his sleigh, a Christmas countdown, and some Seasonal sayings. I LOVE THEM!! :D They are offered in new colors as well. And OH! there are some classroom designs, and some designs for a nursery! :D
A little information on these Decor Elements: basically they are vinyl wall stickers. They are removable on most surfaces. Paint cannot be fresh, it must be dried for at least a week I think before they should be applied. They are easy to apply, just as easy to remove, for apartment dwellers, or people who like to change things up a bit. However, I feel that if you are going to invest in them, you might want them to stay with you. So they can be applied to other items like glass jars, bowls, decorative boxes, plates etc. I applied one of the Manhattan Flowers on the wall in my living room above the entryway into the kitchen, and I put the other two Manhattan Flowers on a cupboard that will move with us when we do move. (The greatest part of all is that the Decor Elements jive well with the other products, so you can make a small paper decoration with stamps and Designer Series paper, and it coordinates with the Decor Elements! My Manhattan Flowers are Chocolate Chip, which is on of the Earth Element colors.) Enjoy! :D And look forward to October!! :D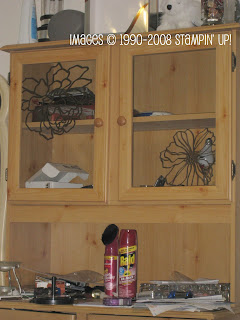
Saturday, September 13, 2008
First class tomorrow!
Here is a little preview of the class I'll be teaching tomorrow. It's a class on Heat and Stick Powder, which is really neat stuff. Kind of messy, but cool. The heat and stick powder, is applied to a stamped image, or just applied to paper with ink, and when heated it becomes a powerful adhesive. Then glitter is applied, and it is heat set so that the glitter does not flake off! I really like playing with it. It is hard to see, in these pictures, but I want to share it anyway! :D

This is made with chipboard, a Loads of Letters "A" and the frame was from a bulk order for demonstrators only, but you can also get it in "On Board Something Seasonal" (you get four) or in "On Board Essentials" (you get one). I used fine cosmo glitter Rose Pink and Light Blue. I stamped the heart from Best Wishes and More, in Passion Pink on Whisper White Cardstock.

This card is 3 3/4 square (kind of still not good at the cutting...). It is folded from whisper white cardstock. I used Chocolate Chip cardstock, and stamped Happy and Birthday from Everyday Flexible Phrases stamp set. I also edged the cardstock in Chocolate Chip ink. I used 4 square pieces of chipboard (again from the bulk order; they are in the center of the frame). I stamped the cake from Fun & Fast notes, and used chalks and blender pens to color the cake. I used a versamarker to color the frosting and trace the heart flames and added dazzling diamonds glitter. I stamped with a Fall Flair (a hostess set) stamp in versamark on each square and added dazzling diamonds glitter.
So exciting!! :D
Thursday, September 11, 2008
Welcome!
Welcome to my Stampin' Up!® blog! It might take me a few months to get this blog really up and running, because so far I haven't really made very much. My collection has been growing though, because I can't help but love all of the products! :D
I guess I should take the time to explain why I decided to become a Stampin' Up! Independent Demonstrator in the first place.
I decided a while back that I wanted to have an additional source of income outside of my nursing career. I was thinking of selling Partylite candles, but my sister-in-law already does that, so I would have to compete with her. (My mom is one of her best customers...) I decided against it. Oddly enough around the time that I resigned myself to not selling Partylite, a patient of mine at the time told me all about her Stampin' Up! business. I looked at the website, and decided I wanted to talk to a current Demonstrator. I picked the first demonstrator I saw, Denise Jorgensen, who had taken the time to update her Demonstrator Website. (The demonstrator websites are all exactly the same until you edit some of the text.) Turns out she has been doing it for 17 years! (Stampin' Up! is celebrating its 20th Anniversary this year...) So I went to her Studio and she showed me products and answered my questions. I was overwhelmed by her studio...she has multiples of almost everything. But she was so excited to tell me all about it I just couldn't wait to join in on the fun!
The next day I signed up, and about a week after that Denise threw my opening party for me. It went well....
So now, I am holding my first class on Sunday. This will be my first activity as Demonstrator where I am doing the demonstrating! The class on Sunday is a Heat and Stick Powder class. It is really neat stuff. Kind of messy, but cool. The heat and stick powder, is applied to a stamped image, or just applied to paper with ink, and when heated it becomes a powerful adhesive. Then glitter is applied, and it is heat set so that the glitter does not flake off! I really like playing with it. It is hard to see, but on the banner of this blog, I used heat and stick powder to apply glitter. The camera did not do the glitter justice.
So if anyone wants to host a workshop, let me know, and we can plan your party!
Subscribe to:
Posts (Atom)